Complete Guide to Nonconformance Management
Table of Contents
- Introduction: The Critical Role of Nonconformance Management
- What Is a Nonconformance?
- The Seven-Step Nonconformance Process
- 1: NCR Creation and Problem Reporting
- 2: Quarantine & Red-Tag
- 3: Triage Team Assignment and Initial Review
- 4: Material Review Board (MRB) Disposition Process
- 5: Disposition-Specific Task Execution
- 6: Defect Classification & Cost of Quality
- 7: Root Cause Analysis to Prevent Recurrence
- Making Nonconformance Management Work
- Digital Nonconformance Management
1. Introduction: The Critical Role of Nonconformance Management
Nonconformance Report (NCR) management or Discrepant Material Report (DMR) management is one of the most critical processes in any Quality Management System. In today's competitive manufacturing environment, your organization's ability to quickly identify, contain, and resolve quality issues directly impacts customer satisfaction, regulatory compliance, and operational efficiency.
Timely reporting and resolution of nonconformances is critical to minimizing impact to your operations and those of your customers. A well-structured nonconformance process serves dual purposes: it prevents defective products from reaching customers while providing valuable data for continuous improvement initiatives that strengthen your entire quality system.
Organizations that excel at nonconformance management transform quality problems from costly disruptions into strategic learning opportunities. Rather than viewing nonconformances as failures, leading companies recognize them as early warning systems that highlight improvement opportunities before they become customer-impacting issues.
This systematic approach to nonconformance management creates multiple layers of value: immediate containment of quality issues, systematic resolution of problems, prevention of recurrence through root cause analysis, and generation of actionable data that drives long-term quality improvement across your organization.
2. What Is a Nonconformance?
A nonconformance occurs when a product, service, or process doesn't meet specified requirements. This broad definition encompasses various types of quality failures that can manifest throughout your product lifecycle, from incoming materials inspection through customer delivery and field service.
Nonconformances can be discovered at multiple detection points throughout your operations. During incoming inspection, you might identify raw materials that don't meet specifications or electronic components that fail testing. Manufacturing processes can reveal machined parts with incorrect dimensions or assemblies missing required components. Final inspection serves as the last internal checkpoint, catching products damaged during production or items that don't meet final acceptance criteria.
Customer-reported nonconformances represent issues that escaped your internal detection systems. These might include equipment that fails during installation, products that don't perform as specified, or services that don't meet customer expectations. Field nonconformances encompass warranty failures, unexpected maintenance requirements, or performance issues discovered during customer operations.
The key to effective nonconformance management is identifying these problems quickly and handling them systematically, regardless of where they're discovered. Early detection significantly reduces resolution costs and minimizes impact on customer operations, making robust detection systems a critical investment for any quality-focused organization.
3. The Seven-Step Nonconformance Process
An effective nonconformance process follows six main steps that ensure systematic handling of quality issues while maintaining the urgency required for rapid problem resolution. Each stage has specific responsibilities and deliverables, creating a structured workflow that prevents issues from falling through the cracks while building the data foundation necessary for continuous improvement.
The process begins with immediate problem documentation and containment, progresses through systematic evaluation and disposition, and concludes with thorough root cause analysis to prevent recurrence. This comprehensive approach transforms reactive problem-solving into proactive quality management that strengthens your entire operation.
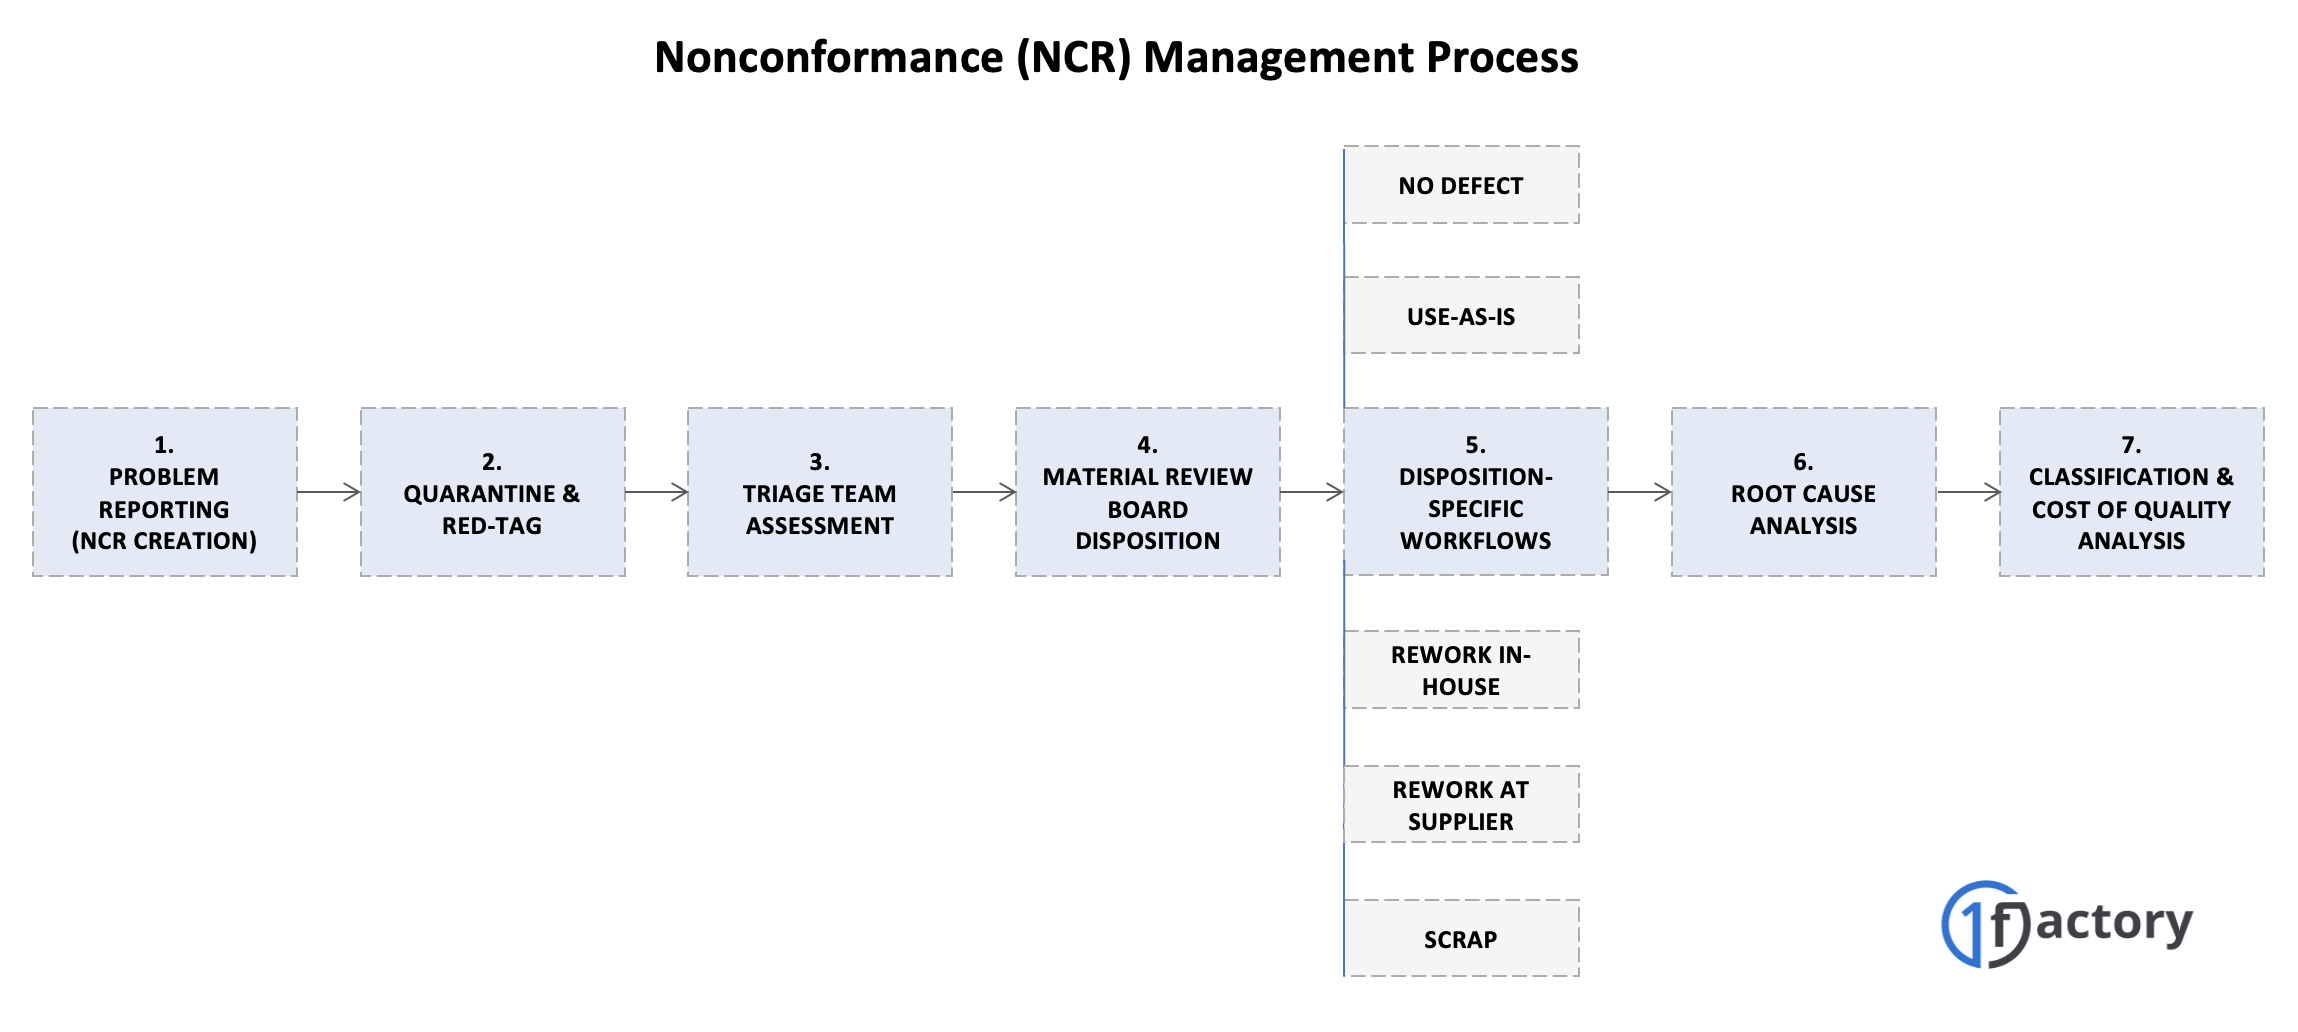
3.1 NCR Creation and Problem Reporting
The nonconformance management process begins when a defective part or quality issue is identified during any inspection or operational activity. The technician, operator, machinist, or inspector who discovers the problem creates a Nonconformance Report (NCR) that serves as the foundation for all subsequent activities.
Effective NCR creation requires comprehensive documentation of all relevant information. This includes essential metadata such as part number, revision level, and description, along with order information including work order numbers and lot identification. Quantity information must specify lot size, inspected quantity, and defective quantity to support accurate impact assessment. For receiving nonconformances, supplier identification is critical for follow-up activities.
The heart of every NCR is a detailed problem description that uses a clear "should be" versus "is" structure. For example, "diameter should be 2.500 ± 0.005 inches, but is actually 2.515 inches." This format eliminates ambiguity and provides the technical foundation for subsequent evaluation activities. When available, photographs should be attached to provide visual documentation of the problem.
For serialized parts, recording specific serial numbers or sequence numbers ensures complete traceability throughout the resolution process. This level of detail supports both immediate problem resolution and long-term trend analysis that drives continuous improvement initiatives.
3.2 Quarantine & Red-Tag
Once the NCR is created, immediate containment becomes the priority to prevent defective parts from accidentally entering production or being shipped to customers. This containment involves both physical segregation and digital inventory controls that work together to ensure complete isolation of suspect material.
Physical containment begins with printing a red tag that includes the NCR number, part information, problem description, affected quantity, and a barcode or QR code linking back to the electronic documentation. This red tag provides immediate visual identification of quarantined material while enabling quick access to detailed problem information.
Digital containment involves moving parts from "WIP Inventory" to a designated "MRB Inventory" status in your ERP system. This status change converts the material from nettable to non-nettable, preventing the defective material from being accidentally allocated to other production orders while disposition is being determined.
This dual approach to containment ensures that defective parts cannot be accidentally used in production while meeting regulatory requirements for separating suspect material from conforming inventory. The combination of physical segregation and digital controls creates multiple barriers against accidental use of nonconforming material.
3.3 Triage Team Assignment and Initial Review
With the nonconformance documented and material quarantined, the next step involves assigning the appropriate expertise to evaluate the problem and determine the best resolution approach. Each NCR is assigned to a Triage Team based on the selected NCR type, ensuring that the right combination of technical knowledge and decision-making authority is applied to each situation.
Organizations typically predefine triage team compositions based on established workflows, though these assignments can be adjusted as needed for specific situations. For receiving nonconformances, teams commonly include Purchasing, Supplier Quality, and Manufacturing Engineering representatives. Manufacturing NCRs typically involve Manufacturing Engineering, Quality Control, and Production personnel. Customer-reported nonconformances usually require Customer Service, Quality Engineering, and Manufacturing Engineering participation.
The triage team performs several critical functions during their initial evaluation. They determine which expert Material Review Board (MRB) representatives are required for each specific defect type, develop preliminary disposition recommendations based on their collective experience, and assess whether additional line items need to be created for complex defects involving multiple failure modes.
This triage process ensures that appropriate expertise is applied to each problem while maintaining efficiency in the overall workflow. By matching the right technical knowledge to each specific defect type, organizations can accelerate problem resolution while improving the quality of disposition decisions.
3.4 Material Review Board (MRB) Disposition Process
The Material Review Board (MRB) disposition process represents the technical heart of nonconformance management, where qualified experts evaluate each defect and determine the most appropriate resolution action. For each line item identified during triage, the team assigns the appropriate MRB representative who possesses the technical authority and expertise necessary to make sound disposition decisions.
MRB representatives select from predefined disposition options that address the full range of possible resolution actions. Each disposition type requires specific approvals based on organizational quality management system requirements, ensuring that decisions are made by personnel with appropriate authority and technical competence.
Common Disposition Options
Scrap applies when parts cannot be salvaged and must be discarded. This disposition requires clear documentation of why repair is not feasible and may require multiple levels of approval depending on the material value involved.
Use As Is applies when parts are functionally acceptable despite minor defects that don't affect performance, safety, or customer requirements. This disposition often requires engineering analysis or customer approval, particularly when deviations from specifications are involved.
Rework In-House applies when parts can be repaired using internal resources and capabilities. This disposition requires clear rework instructions and verification procedures to ensure that repaired parts meet all applicable requirements.
Rework at Vendor applies when parts must be returned to the supplier for repair. This option is typically used when specialized equipment or processes are required that are not available internally.
Return to Vendor (RTV) applies when parts are returned to the supplier for credit or replacement. This disposition is commonly used for supplier-caused defects where repair is not cost-effective.
No Defect applies when further review determines that parts actually meet specifications. This disposition often occurs when measurement errors or specification interpretation issues are discovered during detailed evaluation.
Each disposition requires comprehensive documentation including technical rationale, approver signatures, and specific handling instructions. Organizations should establish clear MRB approval matrices that specify required approvers for each disposition type, ensuring that all approvals are obtained before line item status changes to "Disposed."
3.5 Disposition-Specific Task Execution
After MRB disposition approval, organizations must execute specific workflows to implement the chosen resolution. This structured approach ensures that disposition decisions are carried out completely and consistently while maintaining clear accountability for follow-up actions and cost tracking.
Rework In-House Execution
For in-house rework dispositions, organizations should generate dedicated rework work orders that clearly define the scope of repair activities. Detailed rework instructions and procedures must be created to ensure consistent execution and quality results. Progress tracking systems monitor rework completion while recording actual costs and time investments. Quality verification procedures confirm that reworked parts meet all applicable requirements before release for use.
Vendor Return and Rework Execution
Return to Vendor and Rework at Vendor dispositions require coordination with external suppliers and careful tracking of materials and costs. Organizations must create Return Merchandise Authorization (RMA) requests with vendors and generate rework purchase orders when repair services are required. Shipping and logistics coordination ensures efficient material flow while monitoring systems track vendor rework progress. All associated costs including shipping, handling, and vendor charges must be recorded for accurate cost analysis.
Use As Is Execution
Use As Is dispositions require careful documentation to support the decision and ensure regulatory compliance. Engineering justification and approval documentation must be comprehensive and readily accessible for audit purposes. When customer approval is required, deviation requests must be processed and approved before parts can be released. Quality records and certifications may require updating to reflect the deviation, and appropriate notifications must be sent to downstream users.
Scrap Execution
Scrap dispositions involve both financial and physical disposal activities that must be handled systematically. Scrap authorization approvals ensure that disposal decisions are properly reviewed and documented. Cost calculations should include both raw material value and processing costs incurred up to the point of disposal. ERP inventory write-off transactions must be processed to maintain accurate inventory records, and physical disposal must comply with environmental regulations and company policies.
Each execution workflow includes specific checkpoints and verification steps that ensure complete implementation of disposition decisions while maintaining the audit trail necessary for regulatory compliance and continuous improvement analysis.
3.6 Root Cause Analysis to Prevent Recurrence
The ultimate goal of nonconformance management extends beyond merely fixing individual problems; it's about ensuring that defects never recur. Achieving this requires moving beyond quick fixes and systematically understanding and eliminating the underlying causes of quality issues through robust root cause analysis.
Avoiding the Blame Trap in Problem Solving
A common and critical mistake many organizations make is to begin nonconformance investigations by assigning blame, prematurely categorizing defects as "our company caused" or "supplier caused" with limited information. This approach is highly problematic for several reasons:
- Misguided Conclusions: Experience shows that over half of problems initially classified as "supplier caused" are typically re-categorized after detailed root cause analysis, demonstrating that premature blame leads to incorrect conclusions and wasted effort.
- Damaged Relationships: More importantly, starting with blame fosters confrontation between parties (whether internal departments or external suppliers), making objective problem-solving difficult and severely damaging collaborative relationships essential for quality improvement.
Essential Practices for Effective Root Cause Analysis
Regardless of the tools used, several fundamental practices significantly improve the effectiveness of root cause analysis efforts and ensure that lessons learned are captured for future prevention:
- Treat Every Defect Seriously: Ensure that each defect is meticulously recorded and reported, irrespective of its immediate perceived impact. The availability of comprehensive frequency data is crucial for ranking and prioritizing improvement actions based on actual occurrence patterns rather than subjective impressions.
- Record Actual Measurements: Require all suppliers and internal processes to provide actual part measurement data, not just simple pass/fail determinations. The availability of specification-level measurement data significantly speeds up root-cause analysis and enables more accurate problem characterization, moving beyond mere symptoms.
- Question Specification Accuracy: Make no assumptions about the accuracy or completeness of the specifications themselves. You will be surprised at how often specifications are incomplete, inadequate, or simply incorrect. Specification-related problems frequently masquerade as manufacturing defects, leading to ineffective corrective actions if the true cause isn't identified.
By embracing these practices and strategically applying root cause analysis tools, nonconformances are transformed from reactive problem-solving exercises into proactive improvement opportunities that strengthen your entire quality system and prevent future occurrences of similar problems.
3.7. Classification, Analysis, and Cost Impact
Defect Classification
To foster a collaborative and effective problem-solving environment, begin with objective preliminary classification focused on technical facts rather than responsibility. This initial step guides subsequent analysis and sets the stage for accurate root cause identification.
Start by meticulously reviewing the specification alongside the defective part, consulting all relevant documentation such as drawings, bills of material, and requirements. It's crucial to verify the calibration of measuring instruments and repeat measurements on critical part characteristics to ensure the accuracy of the defect identification itself.
Once these preliminary steps are complete, classify the defect into one of two high-level technical categories:
- Inadequate Process: The part does not meet specifications. This indicates that the manufacturing, inspection, or handling process requires improvement. This classification directs attention to issues related to process capability, control, and execution.
- Inadequate Specification: The part meets specifications, but the specifications themselves are insufficient for the intended application. This classification signals that design requirements, engineering specifications, or testing criteria may need revision.
This objective classification approach proves effective whether defects are found during internal manufacturing or discovered in customer applications, initiating root cause analysis in a collaborative, rather than confrontational, manner.
Cost of Quality
Effective nonconformance management requires comprehensive tracking of the true cost of quality problems to support accurate impact assessment and prioritization of improvement efforts. Organizations must implement cost tracking systems that capture both direct and indirect costs at the line item level, providing visibility into the full financial impact of nonconformances.
Comprehensive Cost Categories
Cost tracking should encompass all categories of expense associated with nonconformance resolution. Scrap costs include raw material value plus processing costs incurred up to the point of disposal, providing a complete picture of the investment lost due to quality problems.
Rework costs encompass additional labor, machine time, and materials required for repair activities. These costs often exceed the original manufacturing costs due to the complexity of repair operations and the need for specialized handling procedures.
Vendor costs include shipping expenses, Return Merchandise Authorization (RMA) fees, and vendor rework charges. These external costs can be significant and are often overlooked in traditional cost accounting systems.
Opportunity costs represent the hidden expenses associated with production delays, expediting fees, and schedule impacts. While more difficult to quantify precisely, these costs often represent the largest component of total nonconformance impact.
Cost Aggregation and Analysis
Cost data should be maintained at both individual line item and aggregate NCR levels to support different levels of analysis and decision-making. Individual line item costs enable detailed analysis of specific defect types and resolution approaches, while aggregate NCR costs provide visibility into the total impact of complex quality problems.
This cost visibility helps prioritize improvement efforts based on actual financial impact rather than subjective assessments of problem severity. Organizations can focus their limited improvement resources on the nonconformances that generate the highest costs, ensuring maximum return on quality investments.
Regular cost analysis also demonstrates the business value of quality improvement initiatives, providing concrete evidence of the financial benefits generated by effective nonconformance management and prevention activities.
3.8. Defect Classification for Continuous Improvement
Systematic defect classification at the line item level enables comprehensive analysis of quality patterns and trends that might not be visible from individual nonconformance reports. This classification system provides the foundation for data-driven continuous improvement initiatives and strategic quality management decisions.
Classification Framework
Effective classification systems organize defects by multiple dimensions to support different types of analysis. Defect type classification groups similar technical problems together, enabling identification of recurring issues that require systematic attention. Root cause classification organizes defects by underlying causes, highlighting process or system weaknesses that need improvement.
Source classification identifies whether defects originate from internal processes, supplier issues, or customer application problems. This information guides improvement efforts and helps allocate resources appropriately across different areas of responsibility.
Analysis and Insights
Proper classification enables organizations to answer critical questions that drive strategic quality improvements. Which suppliers have the most quality issues, and what types of problems are most common? What defect types generate the highest quality costs, and which manufacturing processes need the most improvement attention?
Are quality trends improving or deteriorating over time, and what factors are driving these changes? Which root causes appear most frequently across different product lines or manufacturing processes?
This analytical capability transforms individual nonconformances into strategic intelligence that guides resource allocation, supplier development activities, and process improvement initiatives. Organizations can identify patterns and trends that reveal systemic issues requiring attention, rather than treating each nonconformance as an isolated incident.
The classification system also supports supplier performance management by providing objective data on supplier quality performance across multiple dimensions, enabling more effective supplier development and management decisions.
4. Making Nonconformance Management Work
The key to successful nonconformance management lies in treating it as a systematic process rather than reactive fire-fighting. Organizations that excel at nonconformance management implement comprehensive systems that ensure consistent execution while generating valuable intelligence for systemic improvements that address root causes rather than symptoms.
Strategic Analysis: Finding the Patterns That Matter
Regular analysis of NCR data reveals systemic issues that individual problem-solving cannot address. Multiple nonconformances involving damaged parts across different part numbers often point to inadequate packaging design or handling procedures rather than manufacturing defects. When the same dimensional characteristic fails across multiple suppliers, the issue likely lies in inadequate specifications, unclear drawings, or insufficient GD&T rather than supplier capability problems.
Recurring contamination issues across different production lines may indicate inadequate facility environmental controls or ineffective cleaning procedures. Multiple "missing component" nonconformances often reveal problems with kit preparation processes, work instructions, or inventory accuracy rather than operator error.
This pattern analysis transforms individual NCRs from isolated incidents into strategic intelligence that guides system-level improvements. Organizations should conduct monthly NCR reviews that specifically look for these patterns, asking questions like: "What do these five seemingly unrelated NCRs have in common?" and "If we fixed the underlying system, how many future NCRs would we prevent?"
System Strengthening Through Root Cause Intelligence
Effective NCR analysis goes beyond immediate problem resolution to identify system weaknesses that create multiple failure opportunities. When analysis reveals that 40% of receiving NCRs involve measurement disputes, the real issue may be inadequate incoming inspection procedures, uncalibrated equipment, or insufficient inspector training rather than supplier problems.
If analysis shows that most manufacturing NCRs occur during the first shift, investigate whether different supervisory practices, rushed morning setups, or inadequate shift-change communication creates conditions for defects. When customer NCRs cluster around specific installation procedures, the root cause may be inadequate field service training, unclear installation instructions, or missing tools and equipment.
Organizations should establish systematic review processes that examine NCR data at multiple levels: individual part numbers to identify design or specification issues, supplier performance to identify capability or communication problems, process steps to identify procedural weaknesses, and time periods to identify training, equipment, or environmental factors.
Creating Systemic Improvements
The most valuable outcome of NCR analysis is the identification of systemic improvements that prevent entire categories of future nonconformances. When analysis reveals that packaging-related damage affects multiple part families, implement comprehensive packaging design standards and supplier requirements that address the root cause across your entire supply base.
If contamination issues appear across multiple processes, invest in facility-wide environmental controls and cleaning procedures rather than addressing each incident individually. When measurement-related disputes are common, implement comprehensive calibration programs and measurement system analysis rather than questioning individual results.
This approach transforms NCR management from expensive reactive problem-solving into proactive system strengthening that delivers exponential returns on investment. A single systemic improvement may prevent hundreds of future NCRs while improving overall process capability and customer satisfaction.
Building Organizational Learning
Successful NCR management creates organizational learning that strengthens every aspect of your quality system. Regular cross-functional review meetings should analyze NCR trends and translate findings into specific process, training, and system improvements. Design teams should review NCRs to identify specification and drawing improvements that prevent future confusion. Purchasing teams should use NCR data to guide supplier selection and development activities.
Manufacturing teams should examine NCR patterns to identify process improvements, equipment maintenance needs, and training requirements. Quality teams should use NCR analysis to refine inspection procedures, update work instructions, and strengthen preventive controls.
This systematic approach ensures that organizations learn from every quality problem and continuously strengthen their systems to prevent not just recurrence of specific issues, but entire categories of related problems that share common root causes.
5. Digital Nonconformance Management
While nonconformance management can be handled with paper forms and spreadsheets, digital nonconformance management systems dramatically improve the effectiveness of the entire process by creating simplified workflows that address the core challenges of traditional NCR management.
The Digital Advantage: Simplified Workflows with Enhanced Results
Digital NCR systems transform complex, multi-step processes into streamlined workflows that deliver four critical benefits that paper-based systems cannot match effectively.
1. Cross-Functional Collaboration and Timely Disposition
Digital systems enable seamless collaboration across quality, engineering, manufacturing, and purchasing teams by providing real-time visibility into NCR status and automatic task routing to the right people at the right time. Automated notifications ensure that NCRs never get lost or forgotten, while escalation rules guarantee that urgent issues receive immediate attention.
Triage teams can review and assign NCRs immediately upon creation, while MRB representatives receive automatic notifications when their expertise is needed. This collaboration eliminates the delays inherent in paper-based systems where NCRs can sit unnoticed for days or weeks, ensuring that material quarantine periods are minimized and production impacts are reduced.
2. Thorough Root Cause Analysis
Digital platforms provide structured templates and guided workflows that ensure comprehensive root cause analysis rather than superficial problem-solving. Built-in analysis tools help teams systematically work through 5-Whys or fishbone diagram analysis, while historical data integration reveals patterns and trends that would be invisible in paper-based systems.
The system maintains complete records of all root cause investigations, making it easy to identify recurring issues and systemic problems that require attention. This comprehensive analysis capability transforms individual NCRs into organizational learning opportunities that strengthen the entire quality system.
3. Cost of Quality Tracking
Digital systems automatically calculate and track the true cost of nonconformances by integrating with ERP systems to capture material costs, labor costs, vendor charges, and opportunity costs. This comprehensive cost visibility enables organizations to prioritize improvement efforts based on actual financial impact rather than subjective assessments.
Automated cost tracking also provides immediate visibility into the return on investment from quality improvement initiatives, demonstrating the business value of NCR management and continuous improvement activities.
4. Compliance Through Complete Audit Trails
Digital NCR systems maintain complete, tamper-proof audit trails that document every action, approval, and communication throughout the resolution process. This comprehensive documentation ensures regulatory compliance while providing the evidence needed for customer audits, certification reviews, and internal quality assessments.
Automated documentation eliminates the gaps and inconsistencies common in paper-based systems, while standardized reporting formats ensure that audit requirements are consistently met across all NCRs.
Implementation Impact
Organizations implementing digital nonconformance management systems typically experience dramatic improvements in process effectiveness. NCR resolution times are reduced by 50-70% through automated routing and collaboration. Root cause analysis becomes more thorough and consistent through structured workflows and historical data integration. Cost visibility improves decision-making and demonstrates the business value of quality investments.
Most importantly, modern digital systems, such as 1factory's Quality Management Software, transform NCR management from administrative burden into strategic capability that drives continuous improvement and competitive advantage through better quality, lower costs, and stronger customer relationships.