Defect Root-Cause Analysis: Where do you start?
Table of Contents
- Introduction: Why Root Cause Analysis Matters
- The Foundational Steps of Root Cause Analysis
- Step 1: Defining the Problem Clearly
- Step 2: Data Collection and Initial Classification
- Step 3: Building an Effective RCA Team
- Step 4: Identifying Causes with the Right Tools
- Step 5: Determining the Root Cause and Developing Solutions
- Step 6: Verifying Effectiveness and Sustaining Improvements
- Fostering a Culture of Continuous Improvement
- Appendix: Root Cause Analysis Case Studies
1. Introduction: Why Root Cause Analysis Matters
In manufacturing and across all industries, problems are inevitable. However, simply fixing a problem—a "band-aid" solution—rarely prevents its recurrence. This is where Root Cause Analysis (RCA) becomes indispensable. RCA is a systematic process for identifying the true, underlying reasons for a problem or nonconformance, rather than just addressing its symptoms. Its ultimate goal is to eliminate these root causes, ensuring defects never happen again, thereby preventing costly reworks, delays, customer dissatisfaction, and wasted resources.
Effective RCA transforms reactive problem-solving into proactive quality management. It helps organizations move beyond firefighting to build more robust processes, products, and systems. By understanding *why* failures occur, companies can implement targeted, effective solutions that not only resolve the immediate issue but also drive continuous improvement and strengthen their overall quality framework.
2. The Foundational Steps of Root Cause Analysis
A successful Root Cause Analysis follows a structured approach, ensuring a thorough investigation and effective resolution. While specific tools and techniques may vary, the core process remains consistent, moving from understanding the problem to verifying the long-term effectiveness of solutions. These foundational steps guide your team through a systematic journey to uncover and eliminate underlying issues:
- Problem Definition: Clearly articulating the problem to be solved.
- Data Collection & Initial Classification: Gathering all relevant information about the nonconformance and categorizing it objectively.
- Team Formation: Assembling the right experts to investigate.
- Cause Identification: Using systematic tools to uncover potential and actual causes.
- Root Cause Determination: Pinpointing the deepest underlying reason(s).
- Solution Implementation: Developing and applying corrective and preventive actions.
- Verification & Monitoring: Ensuring the solutions are effective and sustained.
2.1 Defining the Problem Clearly
The most critical step in any root cause analysis is a precise and objective problem definition. Without a clear understanding of exactly what went wrong, all subsequent analysis efforts can be misdirected or wasted. A poorly defined problem often leads to:
- Solving the Wrong Problem: Teams may focus on symptoms rather than the actual issue, leading to ineffective solutions that don't prevent recurrence.
- Wasted Resources: Time, effort, and money are spent investigating irrelevant areas or implementing unnecessary changes.
- Recurring Issues: If the true problem isn't identified, the nonconformance will likely resurface, eroding confidence and increasing costs.
To define the problem, go beyond a general description. Ask "What exactly happened? When, where, and how often does it occur? What is its impact (cost, safety, customer satisfaction)?" This initial clarity guides the entire investigation.
2.2 Data Collection and Initial Classification
With a clear problem statement, the next phase focuses on gathering all relevant information and objectively classifying the defect based on technical facts. This foundational step sets the stage for accurate root cause identification.
Always begin by going to Gemba - visiting the actual place where the problem occurred or the part is being used. This direct observation is crucial. While there, meticulously review the specification in conjunction with the defective part, consulting all relevant documentation such as engineering drawings, bills of material, and requirements documents. Furthermore, it's critical to either locate existing measurement data or verify calibration and repeat measurements on the necessary part characteristics to confirm the defect's presence and nature accurately. Always require actual measurement data, not just pass/fail determinations, as this significantly speeds up analysis. Also, never assume the accuracy of the specification itself; incomplete or incorrect specs often masquerade as manufacturing defects.
Once these preliminary checks are complete, classify the defect into one of two very high-level technical categories:
- Inadequate Process: The part does NOT meet specifications. This indicates a problem with the manufacturing, inspection, or handling process itself.
- Inadequate Specification: The part meets specifications, but the specifications themselves are inadequate for the intended application or performance.
The defect root-cause tree below provides visual examples of how different types of defects align with these two primary categories:
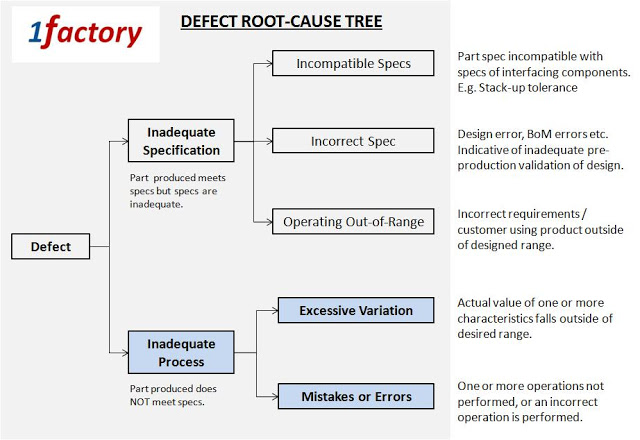
This objective classification framework works effectively whether a defect is discovered during internal manufacturing processes or identified in customer applications, helping to initiate root-cause analysis in a collaborative manner. Remember to treat every defect seriously, ensuring each is recorded and reported to build comprehensive frequency data for prioritization.
2.3 Building an Effective RCA Team
Root cause analysis is rarely a solo endeavor. To thoroughly investigate problems and develop sustainable solutions, it's crucial to gather individuals who collectively possess the necessary information, perspective, and authority to understand and resolve the issue. Instead of rigid job titles, think about the essential insights needed:
- Problem Context & History: Someone who knows the 'what, when, where' of the problem and its past occurrences. This often comes from frontline personnel, quality control, or production management.
- Process Knowledge: Individuals with deep understanding of the relevant manufacturing, assembly, or inspection processes. This could be an operator, a process engineer, or a supervisor.
- Product/Design Expertise: Someone who understands the product's design, specifications, and intended function. This typically involves an engineer or designer.
- Data & Measurement Expertise: An individual capable of collecting, interpreting, and analyzing relevant data, ensuring its accuracy and identifying trends. This might be a quality engineer or a data specialist.
- Implementation Authority: Someone with the ability to approve and enact changes to processes, equipment, or training. This could be a manager, process owner, or department head.
- Facilitator: An impartial individual who guides the discussion, keeps the team focused, and ensures objective problem-solving. This role can often be filled by a quality specialist or a trained lean/continuous improvement lead.
The "team" might be just two or three key people for a simpler problem, or a larger cross-functional group for a complex issue. The key is to ensure all necessary perspectives are represented to allow for a comprehensive investigation and effective solution development.
2.4 Identifying Causes with the Right Tools
With the problem defined and the team assembled, the next critical phase involves systematically identifying potential causes. Different types of problems necessitate different analytical approaches to effectively uncover their underlying reasons. The selection of appropriate tools depends on the complexity and nature of the problem being analyzed, often with tools complementing each other throughout the investigation.
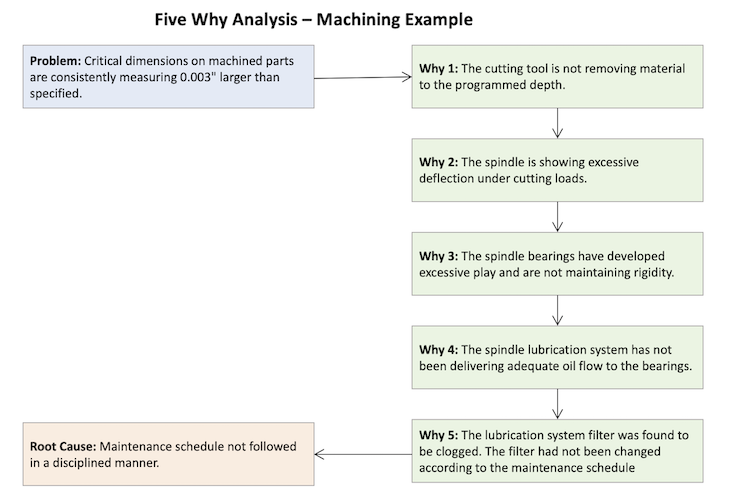
The 5-Whys Technique
The 5-Whys technique is most effective when you have a strong suspicion that a problem stems from a sequential chain of events or a breakdown within a specific process. By repeatedly asking "why" each problem or symptom occurs, this method guides you deeper into the layers of causation. Even if the direct cause-and-effect isn't immediately obvious, the 5-Whys helps uncover that linear path, drilling down to a single, fundamental root cause. It is particularly valuable for process-related issues where one step directly impacts the next. However, if your "whys" start branching in many directions, it might be a signal that a broader approach is needed.
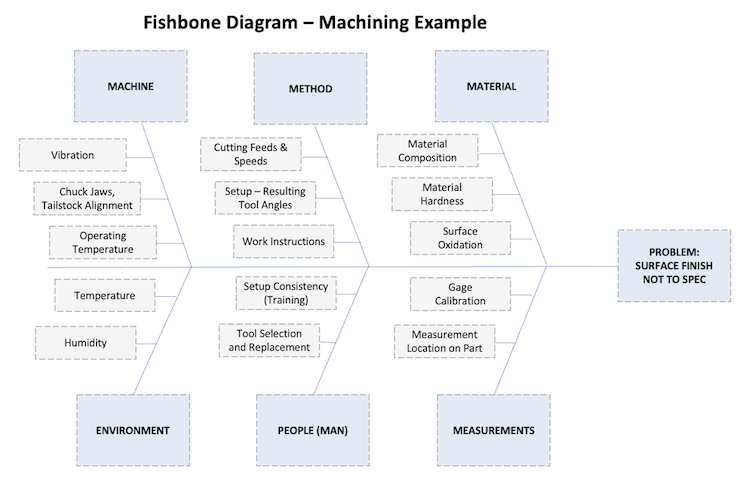
Fishbone Diagrams (Ishikawa Diagrams)
Fishbone diagrams (also known as Ishikawa diagrams) are ideal for complex problems with multiple potential contributing factors. When a problem feels broad, multifaceted, or its causes aren't immediately clear, a fishbone diagram helps you systematically brainstorm and organize all possible contributing factors. These diagrams typically categorize potential causes into areas like Manpower (People), Machines, Methods, Materials, Measurements, and Environment. This comprehensive approach ensures you explore a wide range of possibilities without overlooking important elements, making it easier to visualize the interconnected influences on the problem.
How They Work Together
While distinct, these two tools often complement each other beautifully. A Fishbone diagram can help you identify a wide array of potential causes during an initial brainstorming phase. Once those broad categories or specific factors are identified, you can then select a particular "bone" or identified cause from the fishbone diagram and apply the 5-Whys technique to drill down into its deeper root cause. For instance, if your fishbone points to "Poor Training" under the "People" category, you can then use 5-Whys to understand why the training is poor, leading to the ultimate systemic issue.
2.5 Determining the Root Cause and Developing Solutions
After identifying potential causes, the team must converge on the true root cause(s) - the deepest underlying factor that, if removed or corrected, would prevent the problem from recurring. This often involves validating theories with data and eliminating superficial causes. Once the root cause is confirmed, the next crucial step is to develop and implement effective corrective and preventive actions. These solutions must directly address the root cause, not just the symptoms. It's vital to:
- Develop Action Plans: Create clear, specific, measurable, achievable, relevant, and time-bound (SMART) action plans for each solution. Assign clear ownership and deadlines.
- Implement Changes: Execute the planned changes to processes, designs, training, or equipment. Ensure all affected personnel are trained and understand the new procedures.
2.6 Verifying Effectiveness and Sustaining Improvements
The RCA process isn't complete until you've confirmed that the implemented solutions are effective and that the improvements are sustained long-term. This involves:
- Verify Effectiveness: After implementation, actively monitor the process and collect new data to confirm that the problem has been eliminated and the solution is working as intended. This might involve tracking new defect rates, conducting audits, or reviewing key performance indicators.
- Standardization: Update relevant documentation, such as work instructions, standard operating procedures (SOPs), and specifications, to reflect the new processes and prevent recurrence.
- Communication & Training: Share the findings, root cause, and corrective actions across relevant teams and departments to prevent similar problems from arising elsewhere. Provide ongoing training as needed.
- Monitoring & Review: Establish long-term monitoring plans to track the effectiveness of the solutions and ensure new issues don't emerge. Regularly review RCA outcomes to identify systemic weaknesses.
3. Fostering a Culture of Continuous Improvement
Effective Root Cause Analysis is more than just a set of tools or a step-by-step process; it's a fundamental pillar of a strong culture of continuous improvement. When RCA is embraced throughout an organization, problems are no longer seen as failures, but as valuable learning opportunities. This cultural shift means:
- Proactive Problem Solving: Moving away from reactive "firefighting" to systematically preventing issues before they impact operations or customers.
- Data-Driven Decisions: Relying on facts and evidence to drive investigations and solution development, rather than assumptions or blame.
- Empowered Teams: Equipping and trusting frontline employees and cross-functional teams to identify, analyze, and solve problems at their source.
- Organizational Learning: Capturing lessons learned from each RCA and applying them across the organization to strengthen systems, processes, and designs.
- Sustainable Results: Ensuring that corrective actions lead to long-term elimination of root causes, resulting in lasting improvements in quality, efficiency, and customer satisfaction.
By embedding RCA into daily operations and leadership philosophy, companies can consistently improve their products, processes, and overall performance, transforming challenges into a competitive advantage.
Appendix: Root Cause Analysis Case Studies
Case Study 1: Applying the 5-Whys Technique
Repeated Tool Breakage on Drilling Operation
Background: A machining technician experienced repeated drill bit breakage on a production drilling operation, causing significant production delays and increased tooling costs.
Initial Problem Statement: #29 drill bits keep breaking during through-hole drilling operation on steel brackets, with 6 broken bits in 2 hours.
5-Whys Analysis:
- Why 1: Why do the drill bits keep breaking?
The technician observed that bits are snapping at the flutes during the drilling operation.
- Why 2: Why are the bits snapping at the flutes during drilling?
The technician checked feeds and speeds - the drill is stalling and then grabbing, creating excessive torque.
- Why 3: Why is the drill stalling and then grabbing?
The technician noticed that chips are not evacuating properly and are packing in the flutes.
- Why 4: Why are chips not evacuating properly?
The technician checked the coolant system - no coolant is reaching the drill point for chip evacuation.
- Why 5: Why is no coolant reaching the drill point?
The technician discovered that the coolant nozzle was accidentally moved during setup and is spraying onto the workpiece surface instead of the drill point.
Root Cause: Coolant nozzle was improperly positioned during machine setup, preventing effective chip evacuation.
Corrective Actions:
- Repositioned coolant nozzle to direct flow at drill point.
- Added coolant nozzle position check to setup verification checklist.
- Marked optimal nozzle positions on machine with permanent indicators.
- Trained all operators on proper coolant positioning for drilling operations.
- Implemented peer verification of coolant setup before production runs.
Case Study 2: Applying the Fishbone Diagram
Poor Surface Finish on Turned Parts
Background: A machining shop noticed increasing surface finish problems on turned aluminum parts over a two-week period. Parts were showing visible tool marks and roughness that exceeded customer specifications.
Problem Statement: Turned aluminum parts showing unacceptable surface finish with visible chatter marks and roughness values above specification limits.
Investigation Process:
The shop supervisor gathered a team including the lead machinist, quality inspector, and maintenance technician to systematically examine all potential causes using a fishbone diagram.
Fishbone Analysis Categories:
- Materials
- Bar stock quality issues: Investigation showed material hardness was consistent within specification.
- Surface oxidation was normal and not affecting finish quality.
- Material composition met all requirements.
- Methods
- Machining techniques: Review confirmed cutting speeds and feeds were within acceptable ranges.
- Tool approach angles were consistent between setups.
- Work instructions don't specify required surface finish values or acceptable limits.
- Machines
- Equipment problems: Lathe #3 spindle bearings showing wear - causing vibration during cuts.
- Chuck jaws and tailstock alignment checked and found acceptable.
- Other equipment operating within normal parameters.
- Measurements
- Inspection inconsistencies: Surface finish gauge calibration was current and accurate.
- Measurement locations were appropriate.
- Tool wear monitoring was being followed correctly.
- Environment
- Shop conditions: Temperature and vibration levels checked and found normal.
- Coolant system tested and operating properly.
- Shop conditions ruled out as contributing factors.
- People
- Operator factors: Operators demonstrated proper setup and machining techniques.
- Tool selection practices were appropriate.
- Training levels adequate for normal operations.
Root Cause Analysis Results:
Following the fishbone analysis, the team investigated the most likely causes and discovered:
- Primary mechanical cause: Lathe #3 spindle bearings were worn, creating vibration that caused chatter marks on parts.
- Primary procedural cause: Work instructions lacked specific surface finish requirements and acceptable limits, leaving operators to make subjective judgments about quality.
The team found that while other factors contributed to variability, these two root causes were the primary drivers of the surface finish problems. The worn bearings created the physical conditions for poor surface finish, while the inadequate work instructions meant operators had no clear standard to maintain.
Corrective Actions:
- Mechanical: Rebuilt spindle bearings on Lathe #3 and conducted vibration testing to verify repair.
- Procedural: Rewrote work instructions to include specific surface finish requirements (Ra values), inspection points, and rejection criteria.
- Verification: Added surface finish measurements to setup approval process.
Verification:
Surface finish quality returned to acceptable levels within three days of implementing the corrective actions, confirming the root causes were properly identified and addressed.